Friday, August 21, 2015

Making Displays with Cosmetic Enhancements?

Hello All,

A while back Jenn and I went to the most fantastic flea-market EVER.  It is in Connecticut and called the White Elephant.  It outside and HUGE.  so much cool stuff.  I found a cobblers form that they would use to put new soles on shoes and I now use it to display the sock sample for the kits!  Well on that day of frenzied shopping and imagination overload, I purchase three display forms.  The ones you would use in a store, plastic and hollow backed.  Yeah, those.  Well in my haste to score the buy, he only wanted ten buck for the three of them, I neglected to realize that they were boys or young prepubescent girls.  That my friends was a goof.  We sell yarn to WOMEN (and men) and a display of a gorgeous shawl on a young BOY, that was not going to work.  I could have thrown them out. Nope, that's not me.  So I decided to "fix" them.  I'm frugal, smart and crafty, I can do this, right?

Here is Bruce.  Now please, before you go snarky about not being PC, I think it took a huge amount of bravery and a fantastic support group for Bruce Jenner to do what he did.  I applaud him.  It does not mean I don't respect his choices if I call them Bruce and Caitlin.  

Meet Bruce.  Nice size and clean.  Stands about 2 and a half feet tall and 18 inches wide.  I need a WOMAN!


Looking back now I don't think I needed to do this step, she could have stayed hollow and lessened the risk of mould. 


Must. Have. Boobies.  BTW they all take after me, the right hand side boob is off, bigger, lopsided etc.  Yup, more info then you needed on me, I know.  I like to share.

First display I taped on the dry material, should have continued doing it this way and not applying the wetted crumpled newprint as I did later.  Again, gotta worry about mould.


Made my slurry of flour and water and applied the newsprint to the entire thing, front and back.  Set it in the sun to dry while I started on Katherine (they can't ALL be Caitlin).  It was HOT this weekend, really hot, like Tarzan couldn't stand the heat, H.O.T.  Stuff dried fast.  


Almost, put a butt on her.  Almost. 


Katherine being fitted for her boobies.  New technique and still didn't work too well.  


Even when she is standing up her boobs looked like she was lying down.  Had to fix that.... 


Caitlin on the Right and Katherine on the Left. Hmmmmmmm they don't look like women.... they look like teenage girls with silicone implants.  But you gotta agree they are better than Bruce.


Wow those knockers are BIG and is the left boob squished?  How did that happen?  Grr. 


Between Katherine and Shelia I realized it was the hips that were throwing me off.  So everyone headed back to the operating table to have beautiful, big, holdable hips added to their frames.

Much better.  Here is everyone Saturday afternoon, hanging on the garden gate to dry.  I should not have left them there over night.  It seems that squirrels have a taste for flour and water soaked news paper and took a bite out of Katherine's hip.  The cheek (ha ha get it?) of some animals.


My set up in the shade in the back patio/pit area.  Colin and Peter have been keeping their motorcycles back here and I was able to scam some shade.


Yes, that is my glass of wine with ICE in it.  I did say it was hot right? Next step once they were dry was to add the pretty paper on top.  Half and half water and white glue as the adhesive/glaze.  I used 5 different papers and cut them into the same size squares.  Wanted a quilt like look to them.  All three are in shades of black and white.  Hopefully it will allow the samples to show off their colors.


This is Caitlin done, front and back.  I added a pretty pink flower above her left breast later.  


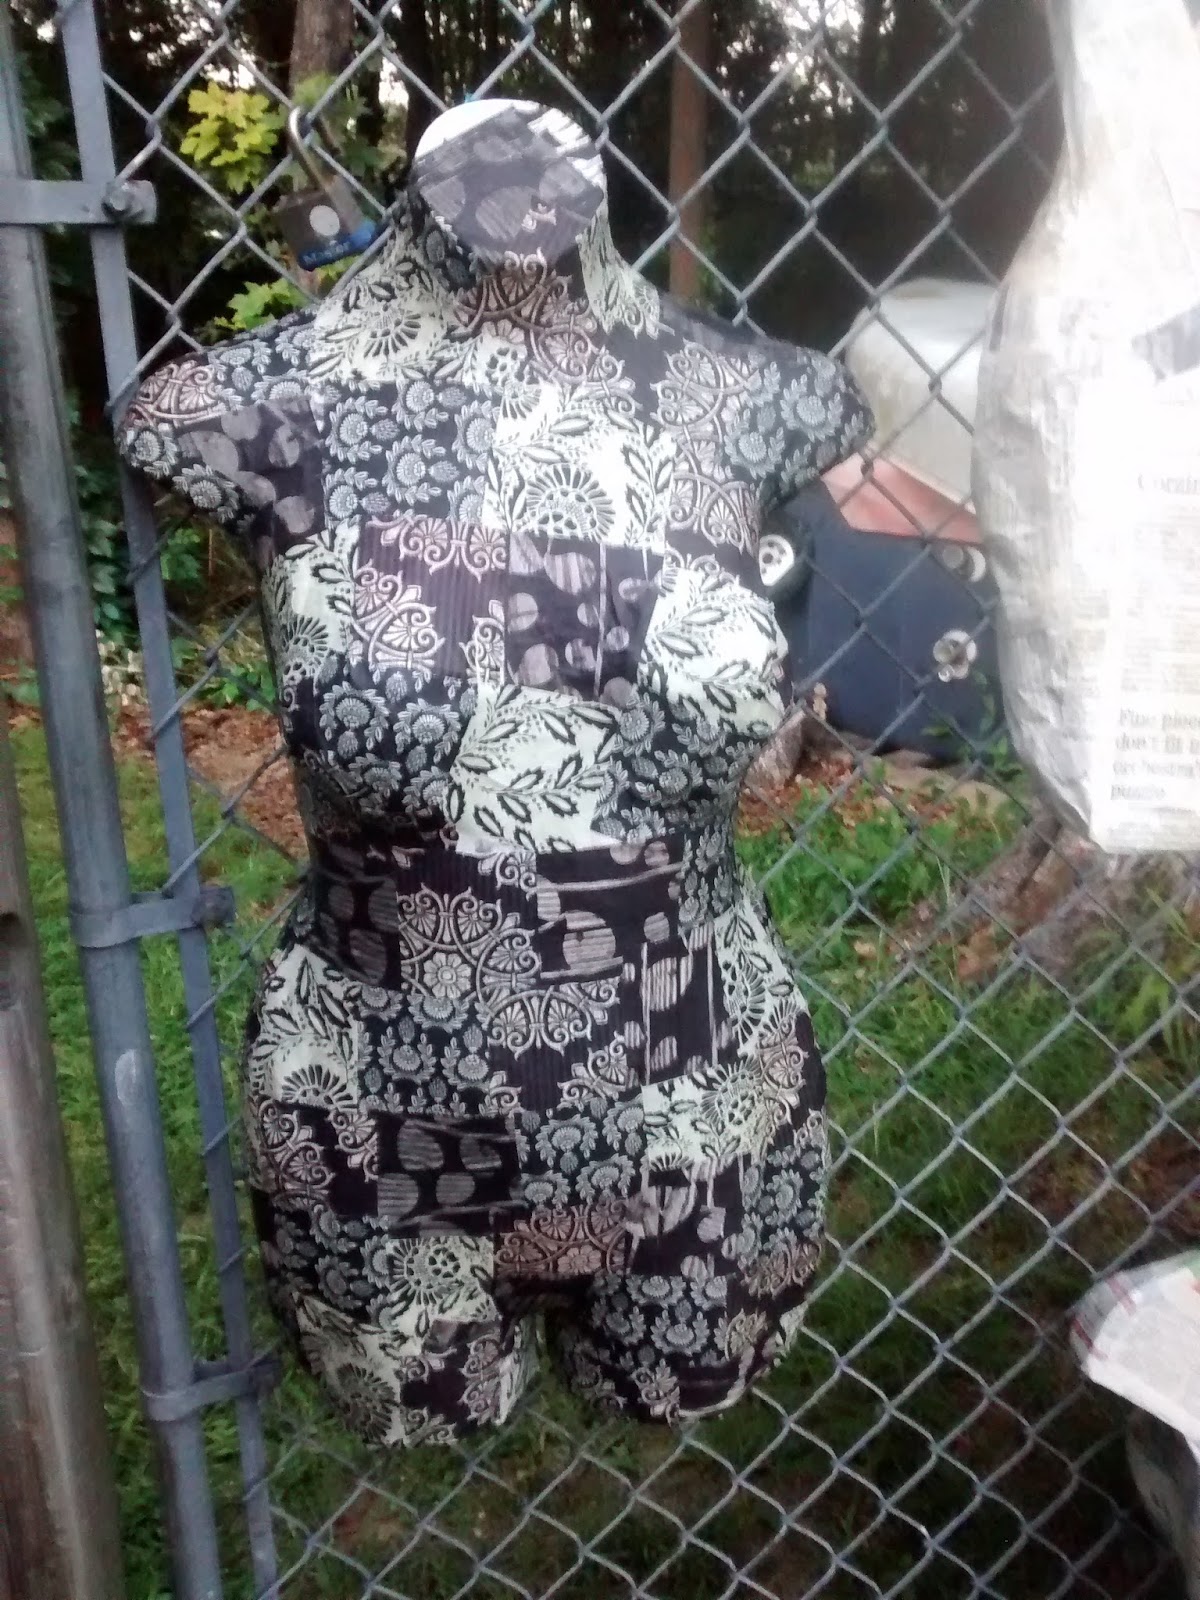
Now to figure out how to hang them above the sales panels at the shows and I'm all set.  They could also be attached to shepherds crooks and planted in a pot of sand to help them stand.....

We shall see what happens to the ladies next....

Happy Crafting,
DD

Tuesday, August 18, 2015

New Technique Tuesday

Hello All,

I'm gonna try something new.  Something that will hopefully help me post to the blog more.  I have a lovely friend Cassie, who is helping us to increase our social media presence.  As those of you who have purchased our stuff know, our yarns ROCK!  Well it seams that the whole world does not know that (yet) and in order for the whole world to know we need to Tweet, FB, Instagram, Blog, Ravelry yadda yadda yadda more.  

Each Tuesday I will  I'm gonna post some pics about what I've learned that past week.  

This week I've tried to copy Malabrigo, not the colors exactly but the way the skeins look.
I'm using a technique that I found on You Tube.  Light Brown Hare was able to give me some insight into the unlimited ways to dye yarn and get different results.  
Check out her video: https://www.youtube.com/watch?v=dAPn2WT4lJg

This is the way Ziggy Stardust (skeins on the bottom) is born.


 Lovely mottling and lots and lots of color interaction.  This is actually a glazing technique with the added surprise of wrapping up the yarns as a resist.  Pretty huh?  The picture can't capture all of the blends.


OK we start with 3 skeins of 400 yards.  For this photo montage I've used my Saunderstown base.  Superwash Merino, Cashmere and nylon, super soft and take the dyes very well.  I've begun to heat the roaster with water and a half tablespoon of citric acid.  The base of Ziggy, like any good baby, is pink.  Not any pink but Pink Orchid. 1 Tablespoon of dye and let the UNWRAPPED skeins swim.  I didn't mix or play with the yarns, I wanted a very mottled base, some lighter and some darker areas.  


This is how they looked loosely wrapped up and ready for the next dyebath.  If I don't want much migration or seepage of the dye I would give the skeins a much tighter twisting.


First bath is Electric Violet.  I let them swim wrapped up and mabie half way thru will roll them around a bit.  Just before the dye has complete exhausted, I gently open the ends up a bit.  I do not open the skein all the way, just try to release any extra tension.


You can tell that the dye mixture will break blue, sucking up the pinky purples first.  The base of the mix is an electric blue and it lends a pale hue to the newly opened skeins. 


You can see after the first bath the pink base, where the purple struck and then the paler blues that happened after opening the skeins up to the un-exhausted dye.


Skeins are drained (and cooled a bit so I can handle them)  then re-skeined loosely, getting ready for the next bath.  Next layer of color is a bright yellow.   The exposed purples begin to turn brown, the blues turn a great green,  and the pinks go orange.  Any yarn that was very pale pink or white are not a bright yellow.  Opened toward the end of the dye, again to get those lighter hues and paler mixes going on.


Even now its a cool looking skein of yarn.  Time to drain, cool, re-skein and get ready for the next bath.


Oooo better picture you can start to see a lot of interaction in the layers of color.


Yum!  If I stopped right now I'd call it "Monet's Water Garden".


Off to our next bath which is PURPLE!  A deep rich royal purple and lots of it.  I wanted this layer dark. To add to the color drama.  So far the colors applied had been in the same tonal family.  I do not open this color as it exhausts, don't ask me why but I didn't and I'm happy about it.


Deep browns and greens, dark eggplant. the greens that were here from the last bath are now beginning to muddy and look earthy.


Last bath is Copper.  A heavy bright orange and chestnut mix.   Sounds a wee bit odd I know but I really wanted the colors to lean darker, dirtyer, earthyer.  My colors tend to be bright and clean and I wanted to work outside of my comfort zone.  


And it worked!  Viola!  Ziggy Stardust is born.


Deep rich multi-layered coloring for a killer variegated skein!  If I do say so myself.  ;)


This is a quick picture of the other skeins in their last bath.  African Safari is not as complex as Ziggy Stardust.  It is just a three color twist dye.  Black, Brown and Gold Ocher.  Opening before the dye exhausts on each color.  


Hope you enjoyed my newest technique, I sure do!  Keep an eye out in the shop, these babies will be going in as a Limited Edition and will not be around for long.  If you would like some of your own Ziggy Stardusts all you have to do is ask.  I LOVE custom orders.

Happy Dyeing,
DD

Friday, April 10, 2015

Whew, it's been crazy

Hello All,

Let me bring you up to speed.  Quit a stressful job with Doctor to run a business hand dyeing yarns and fibers.  Great right?  Right!?!  There was so much I wasn't able to do while at a day job, now I can.  Right!?!

OK back to blogging (one of my To-Do's).....

Latest Colorway:

Meet Babylon Nights:

Magenta to Black - on Merino Tencel it looks a bit more Charcoal, tough to get a true black.


Pretty Sexy Huh?  I've been doing a lot with this colorway, I'm in lust.


NOLAN is back in the shop.  I'll be posting a DYED TO ORDER for this colorway and you will be able to pick a DK or Fingering base.  Sweet!  Hoping for time to work on a nice coordinating color.    Deep blue-black??  Spring green?  Burnt Orange?   Hmmmmmm....  


Welcome our newest base a SINGLE PLY (love them!!) of 100% Superwash Merino.  OMGoodness is this soft.  It looks and feels like silk.  I'm calling the line "Seaside Singles"......what ya think?  I have the Plum Panda, Saunderstown and Beavertail (all beachy places in RI).  Oh damn another Hmmmmmmmm.  That's me thinking if you haven't gotten that yet.  ;)

Almost forgot this is also a new colorway, ELECTRIC RAINBOW.  Looks super cool on the sock blanks too......Spoiler Alert.


Another new colorway and technique (!!).  Its called UP A CREEK  and it is being shown here on our new Seaside Singles - Still not sure I like that name.....
Turquoise, sprout green and aqua screams Spring!!


Newest product to the shop is our Sock Blanks.  Now I see everyone dyeing these things.  I'm putting on my gradients and playing with self striping at the moment.  Check out Love2Knit in East Greenwich, RI  for more of my unballed blanks.

This is WATERMELON I dyed a double strand sock blank with this long gradient and then un wound it into two identical balls,  YES!  for you obsessive people who need their socks to be identical, here it is!  I being one of them.

I looks sorta like sushi, don't it??


Here it is pre-pull.  It's cool all you do is pull from the end and it unwinds super easy.  If you pull the wrong end there is a lock stitch, flip and pull.


Oh! Did I forget to add that the BABYLON NIGHTS comes in a CUPCAKE!?!

Love this!!  500 yards, 10 different color changes.... Yum


Huge excitement here.  I received an e-mail from Jacey Boggs!  Ply Magazine Editor!!  I was asked if I wanted to dye something for an upcoming issue!!
Hell yes!  I don't know if anyone else would be this jazzed, but I freaked.  It's like working for Vogue - well at least to me.

I needed to dye a superlong gradient for the "Singles" issue.  Pink to Wine.

Ok had to do some researching to do the one continuous piece.  Because any of you who have purchased fiber from me knows it comes in three identical pieces.  Well, this was going to be a learning experience for me.  And what fun it was too.  You will be seeing a whole new line of fibers, one continuous piece and new techniques.

Here is the "WINE FLIGHT" that I sent to the spinner. 

* I sent along a little note to her telling her how "excited" I was about the project.  Too queer?  Too enthusiastic?*

Here is what I came up with.  I had to dye a bunch of fiber to get the correct color and mottling.  yes, they will be in the shop soon.

There are two braids, 6 ounces for the spinner and 4 ounces for the photo shoot (yes, photos of MY fiber in PLY!!!)  or JIC she needed more.  Super soft and squishy BFL.  They match very well don't they?


Not the best photo but you see the gradient and the length of the crochet'd roving.  Yes, that is the top of my ironing board......


*************************SPOILER ALERT***********************

FYI:  I do clubs so I can think up new colorways and test out new techniques. My lovely, crazy knitter friend, Lia has purchased many clubs and now I really have to stretch myself to come up with something I haven't already done for her.  So.........

This is April's "Outlander Mini Club" order.  The green end is called Low Kings and the gold end is called High Kings.  This is two mini sets 1200 yards total, the cool thing is they flow flawlessly from one to another.  With this new technique I could just keep the colors going and going and going.  
Each skein has three colors.

Sooooo happy with it.


OK looks like that is it for now.  I'll try harder to keep you up to date.

Happy Knitting!
DD


Monday, January 26, 2015

Studio Re-Do

Hello All,

Well as you know I've been working at JPFA full-time since August and to be honest it has taken a bit of mental restructuring on my part.  My work space had to change as well.  As most of you know my "Studio" was once the family/TV room down in the basement. When we started four years ago I was given a small space at the back of the room, This is where I took pictures, skeined off yarns and prepared the sales for shipping.

OMG!!! Yuck!!!!

Tiny huh?


I was then able to push the "family" space back some and add in another table.  This worked very well for a good while.  it looked like crap and if we had anyone over for movies or one of the boys had a party, I had to package up and store away all of the equipment and bins of product.
Got tedious, FAST.  Especially if I was in the middle of a wholesale order.


So my family decided.....yea well it was more like they got tired of me whining when I had to clean up my projects......that the entire basement should be left to the "cellar dweller".  Smart guys.
So the TV went upstairs to the front room.  Yes, we have a room upstairs that we NEVER used, there was no hardship for them to move, believe me.  The sofa from the basement went up into the boys "common room" on the third floor.  Yes another area where the family and friends can congregate!


I know it looks a bit weird, but when we moved in this space was a *gasp* WORKSHOP.  And the guy had a gas stove in the corner on that raised platform.  Well when we made it into a family room the gas stove went first.  It's not like it worked or anything and we had plans for a wood stove.  We figured it was too much of a pain in the ass to break out the brick platform the stove had been on, so we just rugged over it.  It made a nice place for bean bags and such for the boys to flopp, while we watched the boob tube.

Now that raised space is my office.
I've only put in pictures of when it first went in because believe me, it is NOT that clean now.  The walls are hung with cork boards and covered in notes and lists I have to get done.


I do have a small problem fitting my trash bin, but that should be easy to fix moving forward.

The "studio" portion has different work areas and there is the "kitchen"portion that I'll get to that in a mo. This picture below is taken from the office platform.  The tables are old doors with horses underneath.  I wasn't sure I'd like them but after moving the room around a few times, I have grown to like the modular worktops.  The first table is ball winders and the swift.  I also use the sweater machine on this one.  I was hoping to make my own sock blanks but it is too much of a time suck/annoyance that I will just continue to purchase them.

Table two is the skein winder that my son made me.  Is that not a work of art???  Its electric and I have a foot pedal to vary the speed.  I can use up to 6 cones on that bad boy.  On the end of the table is my drum carder,  It is not always there, I have storage space for that when not in use.  My youngest on made that 2 summers ago.  Yup, SPOILED!!  The smaller 2 foot florescent lights will be replaced by long 4 foot jobbies that will be hung directly over the work surfaces.  While the laboratory is very bright, it can get pretty dark in this side on yucky days.

That tall rack you see was once in the laboratory and now holds bins of finished product.


This is an old picture of the laboratory.  When Jenn and I started this venture my MIL was redoing her kitchen and had these cabinets/sink section to give me.  Hubby added the shelve to the backsplash to hold my dyes.  You can see where that large rolling rack once was.  It held all of the undyed supplies at that time.  Now I have a wall of white cubbies.  The maps were a gift from DH and we put push pins into all of the different city/state/countries that we have sold to.  World Wide Baby!


The walls in the laboratory were not always white, but ugly brown paneling - think 1960's.   We had a pipe burst behind that wall and had to have the entire room replaced.  Whoopie!!

You can see (just barely) a stainless steel table on the left of the room with a large storage cabinet. Yea, it is a narrow space, which I find works wonders for a one-woman show like this.  The cabinet is gone now, under the stairs and I hold the felting/sewing equipment in it. The table has been extended to the full length of the room.


 This is the newest addition.  A counter extension.  I'll be able to fit 4 of the dual hot plates and you can see all of the large storage space underneath.  There is a large hood that will replace the smaller one I have now to suck up and out all of the hot steamy air. Can't have mold growing in my space!

Being in the basement has its ups and downs.  Its toasty warm in the winter (our wood stove is in a small room off to the side) and in the summer it is naturally cool.  The only problem I see is that I NEVER see the sun.

I wonder if I can get them to build me an OUTDOOR studio too..............

Thanks for letting me share the changing studio space.  Next pictures should be up when the vent is done and the tables all painted to match.

Happy crafting!
DD