Hello All,
This is just gonna be a quick post on whats been going on around here, you know, to "sum it up".
Spent the last three weeks feverishly dyeing for my recent Trunk Show at Love2Knit in East Greenwich, Rhode Island. Had a great time, wonderful people and lots of fun. But I'm beat, exhausted if you will.
I've been burning my candle at both ends with the day job and the full time dyeing. It has finally caught up to me, I am now sick. Yup, some bug found me and said "Home Sweet Home". It came on fast and refuses to leave. *sigh* It was bound to happen. So I spend my day, drinking "Emergen C" and blowing my nose.
Regretfully, I am unable to continue on the oh woe is me train and I have to get back to work. Those lovely ladies and gentleman at Love2Knit cleaned me out. I have to get back to work. Jenn and I are also putting together a wholesale catalogue for one or two of my LYS. So I've been working feverishly (or was that the cold?) on that. Poor Jennifer's laptop has passed on, bought the farm, kicked the bucket (you get the idea) and she had our original draft of said booklet. Bummer. Now is the desperate, if not futile attempt to rebuild it and get it ready to send by tomorrow. Yes, I'm wondering what I have been smoking too.
After getting three quarters of the way thru, my DH informed me that a power point presentation board would be a better, more attractive, bet. Where was he four hours ago??? So I start again, dragging and dropping pictures and information. So far, so good. It looks beautiful.
Next, I need to answer questions my, very patient, accountant sent me 15 days ago. She is a saint, really. My DH is the one freaking out. We can not send our personal taxes out until I have the business ones done. Something to do with the partnership, blah, blah, blah. That's why I have Renee, I have absolutely no idea what needs to be done. It will only take some research time to answer them, but God, MORE time at the computer??? Grrrrr I want to go and dye, but nooooooooo paperwork has to be finished first. It's like being back in school, you have to do your homework before doing ANYTHING fun and interesting. I'm sitting here praying for a custom order to come in because that would take precedence to any desk work.
Hello? Anyone? One little skein of yarn? Anyone? Darn, back to bookkeeping.
Let's see what else to tell you.......My youngest son turns 15 tomorrow and is at this very moment at the Airsoft games in Wakefield shooting 7 of his closest friends. When they are done they will come back here for pizza and cake and a movie or two. 8 sweaty teenagers, I have to fumigate the house afterwards. Yuck!
That's me for right now, what's goin' on with you?
Happy Crafting
DD
Sunday, February 23, 2014
Saturday, February 22, 2014
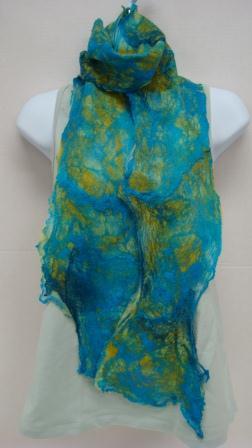
Mawata Silk Scarve - Tutorial
Hello All
Today I am going to help solve that problem of what to do with the beautiful Silk Mawata or Hankies that you buy from us. Silk hankies and wool felted together make a gossamer scarf that weights almost nothing and yet provides wonderful warmth and a great spark of color!
In addition to your hankies and merino you will need:
- 6 feet of bubble wrap that is approximately 1 foot wide
- Twine or cotton string
- dish soap
- 1 foam pool noodle (you can cut your noodle to around 14 inches to make it easier to work with)
- 1 old bed sheet, towel or piece of fabric ripped to the size of your bubble wrap
I started out with less than 0.5 oz of silk hankies and less than 0.75 oz of wool. The finished weight of the scarf is just shy of 1 oz. The shrinkage on this project was minimal. I lost about half an inch in width and about 1 inch in length.
First, lay out your bubble wrap on a sturdy surface. Next, carefully peel the silk hankie bundle into cobweb thin squares and lay them on the bubble wrap.
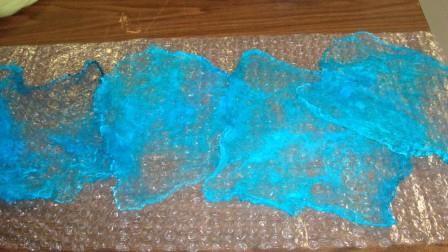
Since I wanted a scalloped edge to this scarf, I laid the sheer silk hankies at a diagonal to each other. If you want a straight edge to your scarf, lay the squares right next to each other. Now you are ready to add some more color!
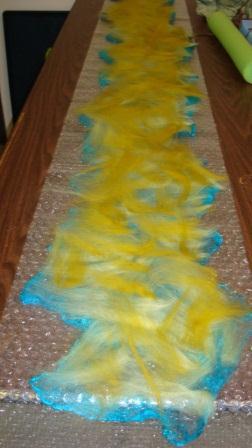
In my project I wanted two colors of merino to contrast with my silk hankies. You, of course, can choose as many color combinations as you want! Lay a thin layer of each of the colors of wool over your silk hankies. Finally top with another layer of stretched silk hankies. Top your silk and wool with a piece of fabric. Sprinkle your scarf-to-be with some HOT soapy water. You want all of the wool to be damp but no puddles.
Now comes the real work. Take the foam noddle and place it at one end. Start rolling your scarf around the foam until all the bubble wrap is around the noodle. Take your twine and secure the scarf tube.
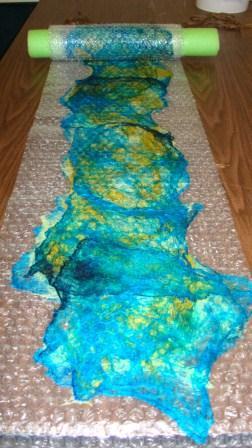
Roll up your sleeves and start applying pressure! This step works best if you are standing. Roll the scarf wrapped foam along the table by applying pressure from your forearms. This can take some time! Completely unroll your scarf and check your progress. You can remove the piece of fabric at this time. Take the noodle and rewrap from the other end of the scarf. This insures even felting. When the fiber has felted to a point where it does not move around or pull away from the scarf you can start tossing the scarf on the table to finish it off! Use it as stress relief! Spank it about until it is felted to your liking. Rinse in cool clean water and lay out to dry. To make that silk really shine, iron your dried scarf on the silk setting. Wear and enjoy!!
Happy Felting
DD
Happy Felting
DD
Subscribe to:
Comments (Atom)