This is my newest fun project. It's super easy, quick and they come out great! I'm going to make more for the people I work with and fill them with candies or such for Christmas gifts.
I think knitting them up took me all of 3 hours per pod. I used our newest yarn "Wickford", it's 100% merino wool, in a bulky single. It takes the dye nicely and felts with little or no work.
I've included the link to the pattern I'm using.
http://olma.blogspot.com/2007/06/pod-pattern.html
It's easy to follow, even for me. Alto I had to review my "Kids Learn to Knit" book to remember how to M1 or increase. I know, duh! I was able to figure it out and then the pod just came together by its self. I knit the first one in a soft turquoise. It's the color I'm thinking of making Jenn her felted slippers in. Shhhhhhhh
Its all soft and saggy so I stuffed it full of paper to keep it upright. You can see the stitch definition easily at this stage, its stretchy and squishy.
(See no more stitch defination its all fuzzy and when I had dried it stuffed with paper it holds its form)
The first one I followed the pattern and this cute little pod was the result.
Then I took it back down stairs, I wasn't crazy about the color. Now that I was successful, I had to find fault with it SOMEWHERE. So I put a wee amount of water back into my small kettle added some more turquoise and then sat the pod into the water. It only came up to about 2/3 high, which was perfect, the dye wicked up slightly into the lighter area at the top, but left the very top the palest original color. I just let it sit int he hot dye water until it exhausted all the dye. Now the bottom is a great dark turquoise that slowly goes off to a pale at the top.
Sooooo sweet, you can see below how small it is. I stuffed it with paper to hold it's shape again and placed it in the woodstove room. The warm air dried it in about an hour. I removed the paper and VIOLA!
Now of course I just couldn't stop here, I had to try out other yarns. Uh Oh! Another addiction?? Hmmmmmm How about handspun?
This yarn is from a scarf kit that I spun but never knit. It was overspun and not a consistent thickness, I was going to let it rot in my stash. There was a gray to black on one skein and then a purple to pale pale lilac on the other. I broke the skeins apart and balled them into the same color. Or as close to it as I could get. This one starts black then I switched over to the purple. You can just barely see the change in darkness as it gets to the bottom, the bottom is really dark purple.
This one is larger like the above picture, I was working with the grays and felt it needed a black stripe to class it up a bit. Looks like my favorite sweater.
Even the bottom is cool!
See slowly but surely I'm making them bigger
This is more handspun yarn, it has angora and angelina in the yarn but once it was felted you really can't see it. :(
Getting bigger!! All I did was manipulate her pattern. More on top on this one before I started expanding the base.
I couldn't leave it there.....I had to do MORE!!
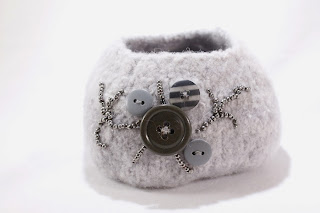
Time to embelish.
Some seed beads and buttons for this one. Mono-chrome to test it out.
Sweet little un-dyed pod with multi-color seed beads.....I wonder what I can do next??
WOOT another successful craft!
Gonna make a TON of these, some for gifts and some to sell them in the shop. Keep an eye out!
Happy Felting
DD


No comments:
Post a Comment